Sphinx Usage in the CRACMM Repository
This page provides documentation for the process of using Sphinx to build HTML for the CRACMM website. It is primarily intended for CRACMM developers at the EPA. Others may or may not find the information presented here useful.
Sphinx is a software written in Python that is used to create HTML files based on already existing files. It is typically used to create websites that document software and it can be used in combination with GitHub’s Pages utility to publish a website based on a GitHub repository. This page explains how Sphinx is used to create a GitHub site for the CRACMM repository using Sphinx.
To view this page on on the CRACMM website instead of in raw markdown (if you’re not already there), click here .
Note: Since this tutorial exists as a page on the CRACMM GitHub Pages site, make sure to regenerate the HTML for the webite after making any changes to this tutorial before making a pull request to the USEPA/CRACMM repository.
Table of Contents
Git Workflow Summary: This section goes over the basic git workflow for updating HTML on the CRACMM GitHub Pages website. If you are looking for detailed instructions on this process, this is not the tutorial you are looking for. Use the “Repository Setup” and “Process to Build HTML” tutorials instead.
Environment Setup: This section provides instructions on how to create a Python environment designed to run Sphinx on the CRACMM repository.
Repository Setup: This section provides instructions on how to get your personal fork of the CRACMM repository ready to build HTML for the CRACMM website, even if you dont have a fork yet!
Process to Build HTML: This section is for people who have a Python environment designed to run Sphinx on the CRACMM repository and provides instructions on how to update the HTML for the CRACMM GitHub pages site based on updates to the main branch.
HTML Build Script Description: This section describes the purpose of the
run_build.cshfile and explains what each command in the file does and why it is needed.Sphinx Configuration Description: This section describes the contents of
conf.pywhich provides Sphinx with a variety of user option that define how the HTML is produced.Website Landing Page Description: This section describes the contents of
index.mdwhich serves as the website landing page and describes how to maintain it so that it always functions as a landing page.Website Global Navbar File: This file stores the table of contents tree (often refered to as “toctree” among Sphinx users), which arranges the left navbar on every page of the website.
Helpful Resources: This section provides links to other websites that have good instructions and tips on how to set up and improve a GitHub Pages site using Sphinx. Many of these websites are also linked in other locations around the page in addition to in the Helpful Resources section.
Git Workflow Summary
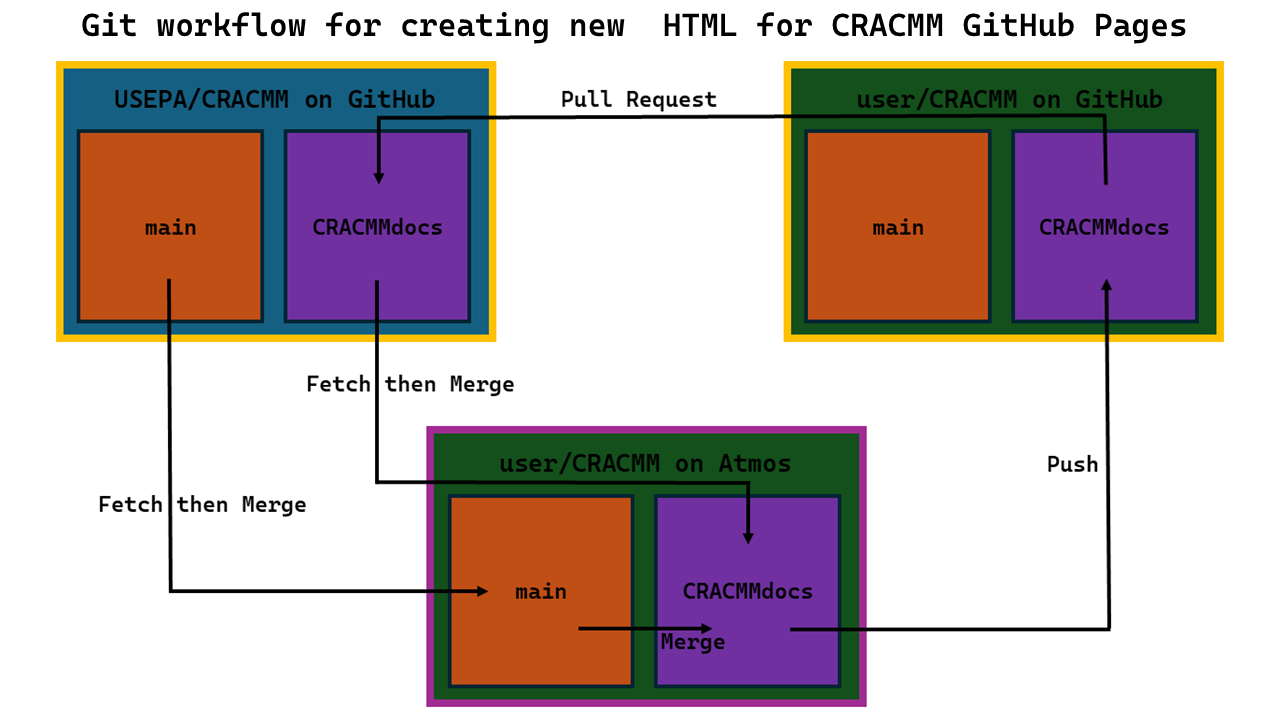
On Atmos, fetch and then merge the latest version of USEPA/CRACMM/CRACMMdocs into your local user/CRACMM/CRACMMdocs branch. Then perform the same set of actions for the user/CRACMM/main branch.
On your local CRACMM repository on Atmos, merge the main branch into the CRACMMdocs branch.
Build new HTML using Sphinx in the CRACMMdocs branch.
Push the new version of the CRACMMdocs branch (with the new HTML) from your local CRACMM repository on Atmos to your remote repository on GitHub. Make sure to push to user/CRACMM/CRACMMdocs.
Submit a pull request on GitHub from user/CRACMM/CRACMMdocs, which contains the new HTML, to USEPA/CRACMM/CRACMMdocs.
To return to the Table of Contents, click here.
Environment setup
If you have never run Sphinx for CRACMM before, you are going to need to set up a new python environment to make sure everything works correctly. The following steps explain how to set up the environment:
To make sure Sphinx works properly, you need to make sure you have the correct Python version running. Version 3.11.11 is suggested for this task because it works with all packages that will need to be installed. It is likely that other versions will work as well but some may cause compataibility issues with the required packages. To use Python 3.11.11, enter the command:
module load python/3.11
To make sure the version is set correctly, you can check your current version by running:
python --version
Once the Python version has been set, it is time to create the new environment. You can give the environment any name you like. For example:
cracmm_docs_env. Run the following command:python -m venv ./cracmm_docs_env
Then, to activate the environment, enter the command:
source cracmm_docs_env/bin/activate.csh
You should now see
(cracmm_docs_env)appear to the left of your LAN ID on the command line. This indicates that the environment has been activated. If you ever need to deactivate the enviroment, enter:deactivate cracmm_docs_env
Next, some Python packages need to be installed so that HTML for the CRACMM website can be produced correctly. Some of these packages are specific to Sphinx processes for building the website, others are for running Python code in Jupyter Notebook files within the repository (these files are executed by Sphinx to build the HTML for the notebooks). Enter the following series of commands to install all necessary packages (the version number of each package used at time of writing is included in the comments after each line):
pip install --upgrade pip           #25.0.1
pip install sphinx                  #8.2.3
pip install sphinx_rtd_theme        #3.0.2
pip install myst_nb                 #1.2.0
pip install sphinx-new-tab-link     #0.7.0
pip install pandas                  #2.2.3
pip install rdkit                   #2.2.4
Description of each installed package related to Sphinx:
sphinx is the software needed to generate the HTML from the files already existing in the CRACMM repository.
sphinx_rtd_theme is a package that acts as a Sphinx extension responsible for the overall website design. Other theme extensions could be downloaded to change website appearance. Some theme extensions come pre-installed with Sphinx.
myst_nb is a package that acts as a Sphinx extenion. It is based on myst_parser and allows markdown and Jupyter Notebook files to be interpreted by Sphinx so that HTML can be generated based on these files.
sphinx-new-tab-link is a package that acts as a Sphinx extension. It allows all external links within Sphinx docuentation to open in a new tab instead of overwriting the current tab.
Once these installations are complete, your Python environment should now be set up to run Sphinx correctly on the CRACMM repository!
Note: if any new Python package is imported into a Jupyter Notebook anywhere within the CRACMM repository, it will need to be installed in the environment designed to run Sphinx. If a new package installation is neccessary, make sure to add it to the list of
pipinstallations above.If your fork of the CRACMM repository on Atmos is not up to date with the latest version, continue to the next section before learning how to build HTML. If you are ready to build HTML, click here to learn how.
Since Jupyter Notebook files are included on the GitHub Pages site, additional steps will need to be taken to make sure the HTML for these files gets generated correctly. When Sphinx builds HTML for Jupyter Notebook files, the notebooks get directly executed. This means that a kernel needs to be installed in the environment for this process to work since Jupyter Notebook files need kernels to run correctly. There are at least two kernels that need to be installed in your Python environment:
xarray_envandxarray_env_kernel. To install them, run the following commands:python -m ipykernel install --user --name=xarray_env python -m ipykernel install --user --name=xarray_env_kernel
Later, when you go to create the HTML for the website, if an error message arises with a notice about a kernel being missing, just add a new kernel to the environment using a similar command to the ones above. Make sure to use the kernel name provided in the error message in order to resolve the error. It would also be helpful to update this tutorial by including the kernel installation command to the list above so that future useres know to include it in their environment.
To return to the Table of Contents, click here.
Repository Setup
If you do not have a fully updated fork of the USEPA/CRACMM repository with all the latest changes, and you would like to update one or more of the HTML pages on the CRACMM website, follow the steps below.
In the case that you do not have a personal fork of the repository at all, make a fork on GitHub now. Then, clone your fork of the GitHub repository to Atmos using the following commands (these commands assume your fork of CRACMM is called “CRACMM”):
cd <path of directory for repository storage>
git clone https://github.com/<GitHub username>/CRACMM.git
cd CRACMM
You should now be in the root directory of your remote fork of the CRACMM repository.
Once you are in your repository on Atmos, you need to make sure that all branches are up to date, not just
main. To do this, enter the following commands:git remote add epacracmm_repo git@github.com:USEPA/CRACMM.git git fetch epacracmm_repo git switch main git merge epacracmm_repo/main git switch CRACMMdocs #if there is no branch called "CRACMMdocs" yet, try this: git switch -c CRACMMdocs git merge epacracmm_repo/CRACMMdocs
Your main and CRACMMdocs branches should now be identical to that of USEPA/CRACMM.
(Optional step. Skip to the next step if you are not making changes to the repository other than the HTML update.) Feel free to make changes to any file on either
mainorCRACMMdocs. However, for files that are on both branches, DO NOT make changes to the version of the file onCRACMMdocs. ONLY make changes to these files onmain, otherwise merge conflicts may arise later. make sure tocommitthose changes before moving on to the next step by running the commands:git add --all git commit
Then add the desired commit message.
If any changes are made to files on the
CRACMMdocsbranch, you may need to update somthing somewhere in this readme file. Please make the necessary updates if there are any relavent changes. Changes toCRACMMdocscan be commited after the HTML is built.Once the
mainbranch of the repository is up to date with all the changes you would like to include on the website, you also need to make the updates appear on theCRACMMdocsbranch. To replicate the changes made tomainonCRACMMdocs, enter the commands:git switch CRACMMdocs git merge main
If you still would like to update the CRACMM website’s HTML and you already have a Python environment set up to run Sphinx, continue to the next section to prepare your Python environment. Otherwise, click here to learn how to set up the Python environment.
Process to Build HTML
The steps to produce HTML for the CRACMM GitHub Pages site are explained below. These instructions assume that you already have a personal fork of the CRACMM repository that is up to date with the lastest version of all files within the repository. If you do not, click here.
When changes are made to the main branch of the CRACMM repository, new HTML will need to be generated in order to stay up to date with the latest version. This is true regardless of whether the changes are made to markdown files used for documentation, or any file that could be downloaded directly via link anywhere on the website. In other words, HTML should ALWAYS be rebuilt every time a change is made to a file within the repository, regardless of how small of a change it is. Of course, this is only true of when you would would like the changes to propgate to the website for the user to see.
Starting in your home directory (
~/) on Atmos, activate your environment for running Sphinx on the CRACMM repository by using the command:source <name of environment>/bin/activate.csh
If you do not have such environment set up, click here to learn how to set one up.
cdto the root directory of your local fork of the CRACMM repository. It is important that you use your personal fork of the repository instead of the USEPA/CRACMM repository. Once you are in the root directory, make sure you are in theCRACMMdocsbranch by entering the command:git switch CRACMMdocs
Before HTML can be built properly using Sphinx, it is important that the Sphinx working path is set correctly. To do this, open up the file
conf.py. In the top section of the file, right before the “Project inormation” section, there should be a line that looks somthing like this:sys.path.insert(1, '<path to a directory>')
Replace the path included in the parentheses with the absolute path of the root directory of your local CRACMM repository. Then, save the file and return to the command line. For more information on the purpose of this line, click here.
Next, enter the
sphinxdirectory by entering the command:cd sphinx
Now its time to build the HTML for the website! To do this, run the command:
./run_build.csh
Once the process is complete, you should have your updated HTML in the docs folder of the repository!
This c-shell script runs a series of commands that prepares the repository for the HTML building, builds the HTML using the
sphinx-buildcommand, and runs another series of commands that cleans up the repository after the build process is complete. For more information on each command within the script, click here.When running this script, be aware that you may recieve several build warnings from Sphinx. Hopefully, none of them will indicate an issue with the website, but depending on the nature of the updates that were made, these may indicate a problem. With the state of the website at the time of writing, approximately 5-20 build warnings is normal and should not mean that there is a problem. Sometimes, the number of warnings can vary even if no change has been made, so be aware that the warnings are not always consistant. Also, the number of warnings that can generally be considered “safe” (not indicating an issue) will likely change as the website develops with time. Therefore, always check the warnings to see whether they may represent an issue with the website. At the time of writing, there are typically several types of build warnings that cause no issue for the website. These are:
“ERROR: Document may not begin with a transition. [docutils]”
“ERROR: Document may not end with a transition. [docutils]”
“WARNING: document isn’t included in any toctree [toc.not_included]”
“WARNING: ‘myst’ cross-reference target not found: ‘’ [myst.xref_missing]”
Although these warnings appear muiltiple times each during the build process, none are a sign of a real issue in the website.
You also may recieve a few warnings from the
rmcommand saying that certain files or directories could not be removed. These do not indicate any issues with the build process and can be ignored.If you have not run the
run_build.cshscript before, you may need to change the file access permissions by entering the command:chmod u+x run_build.csh
Sometimes, if you have not closed your session on Atmos since installing Sphinx in your Python environment, there is a possibility you will need to restart your session for the
sphinx-buildcommand to work. This should only be an issue the first time a Sphinx command is run within a Python environment.
Commit the new HTML to the repository by running the commands:
git add --all
git commit
Then write the desired commit message.
Once the changes have been commited,
pushthe new version of the localCRACMMdocsbranch with the updated HTML up to the remote CRACMM repository on GitHub using the command:git push -u origin CRACMMdocs
Note that the use of
originhere should be a reference to your personal fork of the CRACMM repository on GitHub beacuse all of this work should be done on your fork of the repository.Then, if you made changes to the
mainbranch, make sure topushthe new version ofmainto GitHub as well. Run the commands:git switch main git push -u origin main
Finally, go back to your remote fork of the CRACMM repository on GitHub. It should now look identical to your local fork on Atmos with all changes included.
First, submit a pull request from your
CRACMMdocsbranch, with the updated HTML, to theCRACMMdocsbranch of the USEPA/CRACMM repository. Once this pull request is approved, you will have officially updated the CRACMM documentation!Then, if you made updates to the
mainbranch, submit a pull request from yourmainbranch, with your changes, to themainbranch of the USEPA/CRACMM repository.
To return to the Table of Contents, click here.
File Description: run_build.csh
When building HTML using Sphinx for the CRACMM repository, there are commands that are desireable to run before and after the sphinx-build command (the command that actually generates HTML) every time HTML is built. To save the user time, this c-shell script has been created to run the entire list of commands necessary to accurately produce HTML for the CRACMM repository and minimize sphinx-build warnings. A description of the purpose of each line is included below. It is also important to note that this file should always be run from the sphinx directory, otherwise it will not function correctly and HTML might not be produced.
To view run_build.csh on GitHub, click here .
rm -r ../docs/*
Cleans out the directory where HTML documentation is stored to guarantee a fresh start on the HTML every time run_build.csh is run.
mkdir ../utilities/output
Creates a directory for Jupyter Notebook output files to be temporarily stored while the notebooks are executed during the sphinx-build command. The files put here are not needed and this directory is deleted after the sphinx-build command is completed.
cp ../index.md ../index_duplicate.md
Makes a duplicate of index.md called index_duplicate.md. The duplicate that is created does not contain the Sphinx toctree directives that are added by the next command to index.md. index_duplicate.md is included in the main toctree of index.md, allowing the user to access a copy of the landing page from the left navbar. There may be other ways of adding the landing page to the main toctree, but this seemed like a simple solution.
python3 python_scripts/add_toctree.py
This script takes the original index.md file and adds a series of Sphinx toctree directives to the bottom of it. This serves as the global navbar for the website. It adds the toctree directives from the file toctree.txt, which stores the toctree information so that index.md dosent have to. This allows index.md to appear as a regular markdown file while in the GitHub repository, but it can live up to its full potential of defining the global navbar on the website.
sphinx-build .. ../docs
Builds HTML files based on markdown files. This is where Sphinx actually operates on the CRACMM repository. It takes input from the root directory of the repsoitory (hense the .., which is the relative path to the root directory from the sphinx directory) and produces output HTML files in the docs directory (hense the ../docs, which is the relative path to the docs directory from the sphinx directory). For more information on the sphinx-build command, click here .
python3 python_scripts/delete_toctree.py
This script overwrites index.md and does not add the toctree directives back into it so it can just be a regular markdown file in the GitHub repository. No ugly Sphinx directives on CRACMM’s markdown!
touch ../docs/.nojekyll
Creates a .nojekyll file in the docs directory. This is an empty file that tells GitHub Pages that all the HTML styling has been done already and it does not need to go through extra steps to format to jekyll style. If this file is not added to the docs directory, the website styling created by Sphinx will not function.
rm -r jupyter_execute
Removes files created when running the Jupyter Notebooks that are not necessary. This line may cause an error related to there being no file or directory called jupyter_execute, this error can be ignored.
rm -r ../jupyter_execute
Removes files created when running the Jupyter Notebooks that are not necessary. This line may cause an error related to there being no file or directory called ../jupyter_execute, this error can be ignored.
rm -r ../utilities/output
Removes output files created by the code in the Jupyter Notebooks that are not necessary. Click here for more details on the purpose of this directory.
rm ../index_duplicate.md
Removes the duplicate copy of index.md, which is not needed for the GitHub repository. Click here for more details on the purpose of this file.
rm ../docs/.doctrees/environment.pickle
environment.pickle is created by the sphinx-build command and ends up in the docs/.doctree directory. .pickle files are executable code and can cause security issues when shared with others. This file is deleted to make sure it does not get shared with others. If other .pickle files are found, please add another line similar to this one to prevent these additional files from being shared with the public.
To return to the Table of Contents, click here.
File Description: conf.py
conf.py is a Sphinx generated file produced by the sphinx-quickstart command which initializes a Sphinx project (click here to watch a video about what the sphinx-quickstart command does). The file is responsible for providing Sphinx with important information about how to configure and create your HTML. The file has four different sections, each serving a diferent purpose. For additional information about conf.py and all the variables that could be added to it, click here .
It should also be noted that the file location of conf.py is extremely important. Make sure to keep it in the root directory of the repository. Otherwise, it will interfere with the commands set up in run_build.csh.
To view conf.py on GitHub, click here .
Path Setting
The first section is not titled and comes before the section titled “Project Information”. At the bottom of this section (right above the Project Information section), there are two lines of Python code. These lines are:
import sys
sys.path.insert(1, '/path/to/local/CRACMM/repository')
The purpose of these lines is to include the path of the root directory of your local CRACMM repository in the Python system path. This allows Sphinx to use this path as a base to generate the website from. In other words, Sphinx will only make HTML based on files within this directory and the files in its sub-directories. Make sure this path is set correctly, otherwise you may come across several issues.
Project Information
In the Project Information section, there are four string variables. These are all based on the sphinx-quickstart prompt inputs. If necessary, these can be changed to update responses to the prompts and the results of those changes will carry forward throughout the project. At the time of writing, these lines looked like this:
project = 'CRACMM'
copyright = 'CRACMM does not have copyright'
author = 'U.S. Environmental Protection Agency'
release = '2.0'
In this case, the copyright variable is set to 'CRACMM does not have copyright' because the US government cannot copyright any of its products. Although this should not change anything on the page, it acts as a placeholder to make it clear that there is no copyright in case a copyright message accidentally shows up somewhere.
General Configuration
The General configuration section is an important part of conf.py. By default, after running sphinx-quickstart, the section looks like this:
extensions = []

templates_path = ['_templates']
exclude_patterns = ['_build', 'Thumbs.db', '.DS_Store']
The extensions list is where all the Sphinx extensions are added to the project so that the resulting HTML can be produced in the desired way. For example, if you would like to make HTML files from markdown files, you will need to add an extension. There are many extension options across the internet and some that are built-in when Sphinx is downloaded. For the state of the CRACMM website at the time of writing, there are only two extensions needed and, thus, the list looks like this:
extensions = ['myst_nb', 'sphinx_new_tab_link']
None of the other default lines in this section were altered from their original state (the templates_path and exclude_patterns variables). However, three new lines were added to the section:
myst_enable_extensions = ['dollarmath']
myst_heading_anchors = 4
new_tab_link_show_external_link_icon = True
The first variable that was added,
myst_enable_extensions, allows extensions to be added to themyst_nbextension. In this case, thedollarmathextension was added, allowing LaTeX code in markdown and Jupyter Notebook files to format correctly when the HTML is produced.The
myst_heading_anchorsvariable resolves build warnings regarding myst not finding target IDs when linking to markdown headings. The value of the variable indicates the lowest level heading that Sphinx will link to. However, even if a link is made to a lower level heading that what is indicated bymyst_heading_anchors, the link should still work, but it may cause a build warning.Finally, the variable
new_tab_link_show_external_link_iconis a part of thesphinx-new-tab-linkextension. When set to true (as it currently is) It tells Sphinx to add an icon at the end of every external link across the website.
There are many other variables that can be added to this section that are built-in with Sphinx and many more that are connected to the Sphinx extensions that can be installed by adding them to the extensions list. As the website develops further, remember that there are many possibilities here.
Options for HTML Output
The last section of conf.py is the “Options for HTML Output” section. This section contains a few variables that influence the appearance of the HTML that is produced by Sphinx. When produced by sphinx-quickstart at project initalization, the section looks like this:
html_theme = 'alabaster'
html_static_path = ['_static']
The
html_themevariable tells Sphinx how to arrange the website HTML. It governs the overall appearance of the site. There are several built-in themes that come with Sphinx and others that can be installed in your Python environment.The
html_static_pathvariable does some sort of path setting where it tells Sphinx where to look for certain files. However, this variable was left alone and, for that reason, it is a little unclear exactly how it functions.
After making some changes to this section for the CRACMM repository, the Options for HTML Output section now looked like this at the time of writing:
html_theme = 'sphinx_rtd_theme'
html_static_path = ['_static']
html_css_files = ["custom.css"]
html_logo = 'logos/CRACMM_1.png'
html_show_copyright = False
The
html_themevariable has been changed from'alabaster'to'sphinx_rtd_theme'. The “rtd” stands for “Read the Docs”, which is another software documentation website hosting service similar to GitHub Pages. This theme is the theme used by all Read the Docs pages.As stated previously, the
html_static_pathvariable remains unchanged from its default state. A directory called_static(the default directory name stored within thehtml_static_pathlist) was added to the root directory of the repository and it contains a file calledcustom.css.The
html_css_filesallows the user to load in.cssfiles that add extra styling preferences to the HTML pages. In this case, a file calledcustom.csswas added to thehtml_css_fileslist. This file contains a line of CSS code that reduces the width of tables that appear on the HTML by allowing for text wrapping withing table cells. This means that for wide tables, much more of the table is visible without needing to use the scroll bar at the bottom of the table. To viewcustom.csson GitHub, click here .The
html_logovariable is an added variable that is built-in with Sphinx and it sets the path to an image that is included in the upper left corner of the website above the site’s search bar. in this case, it adds the CRACMM logo to the page.Lastly, the
html_show_copyrightvariable tells Sphinx whether or not to put copyright information at the bottom of the page. When set toTrue(the default setting), the copyright information appears on the footter of every page. when set toFalse, like it is now for CRACMM, this information does not appear. The reason for adding this variable is because the US Government cannot copyright any of its products, so having copyright information here would not be accurate.
Just like with the General Configuration section, there are many other variables that can be added to the Options for HTML Output section that are built-in with Sphinx and many more that are connected to the Sphinx extensions that can be installed by adding them to the extensions list. As the website develops further, remember that there are many possibilities here.
To return to the Table of Contents, click here.
File Description: index.md
The file index.md organizes the landing page of the website. When Sphinx is run, it takes index.md and uses it to create a file in the docs directory called index.html. When Github Pages sees the index.html file, it automatically recognizes the name and sets it to be the landing page for the website. Therefore, it is extremely important that the name of index.md does not change. This is also true of the file location, it needs to stay in the root directory of the repository for GitHub Pages to find index.html. In addition, all changes made to this file should be made in the main branch, do not make changes in the CRACMMdocs branch.
To view index.md on GitHub, click here .
To return to the Table of Contents, click here.
File Description: toctree.txt
toctree.txt is responsible for organizing the global table of contents tree (often refered to as “toctree” among Sphinx users) for the website. The contents of the toctree directives in toctree.txt become the contents of the navbar on the left side of the screen when on the website. toctree.txt is actually not a file used by Sphinx. Instead, its contents are added at the bottom of index.md by a command in run_build.csh (click here for more details on why this process is done) and then removed after the build process by another command. Any updates to the website navbar should be made in toctree.txt.
To view toctree.txt on GitHub, click here .
The file starts with a section that starts with the following line:
```{eval-rst}
Once the contents of this file are copied to the bottom of index.md, this line indicates to Sphinx that what is below it is ReStrctured Text and not markdown. ReStructured Text is the native text language of Sphinx. This allows Sphinx directives to be included in this part of the markdown file.
Next is a series of toctree Sphinx directives. Each one creates a new section of the website navbar. An example of one of these sections is the “Contents” section, which looks like this:
.. toctree::
   :caption: Contents
   :hidden:

   index_duplicate.md
   chemistry/README.md
   emissions/README.md
   metadata/README.md
   logos/logos.md
   boundary_conditions.md
   utilities/README.md
The first line includes “..” which starts a comment in a ReStrctured Text file. Everything that is indented to the same level as the first “t” in
toctreeis included in the comment until text stops sharing that indent level. In this case, sincetoctreeis a Sphinx directive, all lines of the code above are part of this particular directive because it is all part of the same comment.The next line,
:caption: Contents, is an option of thetoctreedirective. It simply gives a name to the following list of links to help group navbar items. In this case, the group of links is named “Contents”.The
:hidden:option prevents the toctree from being visible at the bottom of the page. That way you dont get a second version of thetoctreein bullet point format when the HTML is built.Afterwards is a blank line follwed by a series of links to other documents. The blank line indicates to Sphinx that there are no more
toctreeoptions being specified, and the links allow the website user to easily navigate the website.
You can add new links to any of the listed toctrees by adding a relative link to a markdown or Jupyter Notebook file. When adding links to a toctree, make sure to set the links relative to index.md and not run_build.csh, even though Sphinx is ultimately run from run_build.csh.
You can also add external links to the contents of a toctree. To do this, in a new line of the toctree, write the text you would like to appear on the navbar, and then in angle brackets, write the link. An example from index.md at the time of writing looks like this:
CMAQ Documentation <https://usepa.github.io/CMAQ/>
On the navbar, only “CMAQ Documentation” is visible. When you click on “CMAQ Documentation” in the navbar, it takes you to https://usepa.github.io/CMAQ/ .
To return to the Table of Contents, click here.
Helpful Resources
General Software Documentation
Sphinx : Homepage for Sphinx. Lots of useful deatils across the website describing how to use various Sphinx features.
GitHub Pages : Main page for GitHub Pages help. Gives some simple tutorials on how to get a Pages website up and running and has a “Pages Help” button in the upper right corner for more specific issues.
MyST Parser : Homepage for MyST Parser. Covers all sorts of functionality of the software throughout the website.
MyST NB : Homepage for MyST NB. Discusses the extra functionality of the Sphinx extension that is not included in the MyST Parser extension.
Sphinx New Tab Link : GitHub page for the
sphinx-new-tab-linkextention. The readme in the root directory is helpful for explaining how to use the extension.Sphinx Read the Docs Theme : Homepage for details about the
sphinx_rtd_theme. HTML customization options and other things related to the theme can be found here.
Task Specific Documentation and tutorials
Publishing to GitHub Pages : If the website has not yet been published, this YouTube tutorial does a great job explaining how to publish your Sphinx generated HTML using GitHub Pages.
Sphinx Directives : Sphinx functionality that exists beyond the ability of markdown files’ syntax uses a series of “directives”. Normally these would be contained within the comments of a ReStructured Text (rst) file, the native file format of Sphinx. This page details the directive options available if additional directives are desired with development of the website after the time of writing.
Built-in Sphinx Extensions : This page provides a list of all built-in Sphinx extensions and allows you to navigate to the description of each one. It also describes how ot find other extensions.
Staring Fresh with Sphinx: Since the Sphinx project for CRACMM has already been set up, the links below will not likely be useful. However, understaning the basics of how to start a Sphinx project might become handy to some people, especially in the case that a new sphinx project needs to be created.
To return to the Table of Contents, click here.
author: Michael Pye (pye.michael@epa.gov)
date: 2025-03-04